Multiple Viewports in Processing

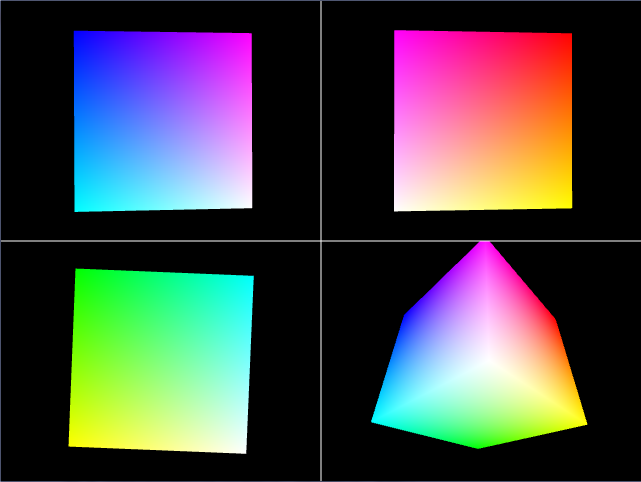
When getting started with 3D, it can be difficult to understand exactly what’s happening in the scene. Using viewports, you can view the same scene from many different angles at once. Rendering the same object in several different views isn’t as hard as it would appear at first. In this tutorial, I’ll show you how to do it in Processing using the RGBCube as an example.
Viewports are used to render a 2D or 3D scene into a smaller section of the window instead of the entire window. This is useful when a scene needs to be rendered from different viewports or when the window needs to change the size of the rendered area to make room for additional information.
To get started, we’ll setup a few PGraphics objects. These are the objects that will render the scene in an off screen graphics buffer to be drawn to the screen later. Rendering off screen allows us to change how the graphics will be shown on the screen and gives us greater control of the over all render.
PGraphics q1, q2, q3, q4;
The objects q1, q2, q3, and q4 must be setup differently than normal objects. Instead of creating them with new PGraphics(…) like we would do for other classes, we need to use createGraphics(…) instead. This constructs a PGraphics object for us and handles a lot of background that we don’t need to know to setup the buffer. A major bonus about using PGraphics over rendering directly to the screen is PGraphics objects support transparency allowing to save images with transparancy such as PNG or TGA. Its important to note that createGraphics(…) must be called with the same P2D or P3D parameter passed to size(…).
q1 = createGraphics(width/2, height/2, P3D);
q2 = createGraphics(width/2, height/2, P3D);
q3 = createGraphics(width/2, height/2, P3D);
q4 = createGraphics(width/2, height/2, P3D);
To make the screen render for each viewport, another function is used to render the scene and is passed the viewport to render to. In this example, the function drawQuadrant(…) takes the PGraphics object and camera parameters to make each viewport different.
drawQuadrant(q1,new float[]{100,0,0,0,0,0,0,0,1});
drawQuadrant(q2,new float[]{0,100,0,0,0,0,0,0,1});
drawQuadrant(q3,new float[]{0,0,100,0,0,0,0,1,0});
drawQuadrant(q4,new float[]{57,57,57,0,0,0,0,0,1});
After drawing into q1, q2, q3, and q4 the graphics buffers are then drawn to the main window using the image(…) function. This specifies where to draw each of the viewports to the screen and handles drawing the viewport/graphics buffer) to the screen.
image(q1, 0, 0);
image(q2, width/2, 0);
image(q3, 0, height/2);
image(q4, width/2, height/2);
Here’s the complete code you can use to recreate the example in Processing.
PGraphics q1, q2, q3, q4;
float xmag, ymag = 0;
float newXmag, newYmag = 0;
void setup()
{
size(640, 480, P3D);
// |——-|——-|
// | Q1 | Q2 |
// |——-|——-|
// | Q3 | Q4 |
// |__|__|
q1 = createGraphics(width/2, height/2, P3D);
q2 = createGraphics(width/2, height/2, P3D);
q3 = createGraphics(width/2, height/2, P3D);
q4 = createGraphics(width/2, height/2, P3D);
}
void draw()
{
// move scene drawing to drawQuadrant(…)
// allows us to draw several views of the same scene
drawQuadrant(q1,new float[]{100,0,0,0,0,0,0,0,1});
drawQuadrant(q2,new float[]{0,100,0,0,0,0,0,0,1});
drawQuadrant(q3,new float[]{0,0,100,0,0,0,0,1,0});
drawQuadrant(q4,new float[]{57,57,57,0,0,0,0,0,1});
image(q1, 0, 0);
image(q2, width/2, 0);
image(q3, 0, height/2);
image(q4, width/2, height/2);
stroke(255);
line(0,height/2, width, height/2);
line(width/2,0, width/2, height);
}
void drawQuadrant(PGraphics pg, float[] camParams)
{
pg.beginDraw();
pg.colorMode(RGB, 1);
pg.background(0,0,0);
pg.noStroke();
pg.camera(camParams[0],camParams[1],camParams[2],
camParams[3],camParams[4],camParams[5],
camParams[6],camParams[7],camParams[8]);
// draw common scene
drawRGBCube(pg);
pg.endDraw();
}
void drawRGBCube(PGraphics pg)
{
pg.pushMatrix();
newXmag = mouseX/float(width) * TWO_PI;
newYmag = mouseY/float(height) * TWO_PI;
float diff = xmag-newXmag;
if (abs(diff) > 0.01) {
xmag -= diff/4.0;
}
diff = ymag-newYmag;
if (abs(diff) > 0.01) {
ymag -= diff/4.0;
}
pg.rotateX(-ymag);
pg.rotateY(-xmag);
pg.scale(30);
pg.beginShape(QUADS);
pg.fill(0, 1, 1); pg.vertex(-1, 1, 1);
pg.fill(1, 1, 1); pg.vertex( 1, 1, 1);
pg.fill(1, 0, 1); pg.vertex( 1, -1, 1);
pg.fill(0, 0, 1); pg.vertex(-1, -1, 1);
pg.fill(1, 1, 1); pg.vertex( 1, 1, 1);
pg.fill(1, 1, 0); pg.vertex( 1, 1, -1);
pg.fill(1, 0, 0); pg.vertex( 1, -1, -1);
pg.fill(1, 0, 1); pg.vertex( 1, -1, 1);
pg.fill(1, 1, 0); pg.vertex( 1, 1, -1);
pg.fill(0, 1, 0); pg.vertex(-1, 1, -1);
pg.fill(0, 0, 0); pg.vertex(-1, -1, -1);
pg.fill(1, 0, 0); pg.vertex( 1, -1, -1);
pg.fill(0, 1, 0); pg.vertex(-1, 1, -1);
pg.fill(0, 1, 1); pg.vertex(-1, 1, 1);
pg.fill(0, 0, 1); pg.vertex(-1, -1, 1);
pg.fill(0, 0, 0); pg.vertex(-1, -1, -1);
pg.fill(0, 1, 0); pg.vertex(-1, 1, -1);
pg.fill(1, 1, 0); pg.vertex( 1, 1, -1);
pg.fill(1, 1, 1); pg.vertex( 1, 1, 1);
pg.fill(0, 1, 1); pg.vertex(-1, 1, 1);
pg.fill(0, 0, 0); pg.vertex(-1, -1, -1);
pg.fill(1, 0, 0); pg.vertex( 1, -1, -1);
pg.fill(1, 0, 1); pg.vertex( 1, -1, 1);
pg.fill(0, 0, 1); pg.vertex(-1, -1, 1);
pg.endShape();
pg.popMatrix();
}


